Line 1/Line
2 Setup
The Line
Setup tabs give detailed information about the VoIP network and may be
switched between Standard and Advanced view. The default view is Standard,
and may be changed by clicking the button shown below:

Settings
for Line 1 and Line 2 are identical.
In
Standard view, a user will have the option of configuring a SIP Config
tab, Features and Dial Plan settings. In Advanced view, the user is given
additional options under these tabs and the option of configuring Quality
of Service, Network Address Translation (NAT) and Voice Features.
SIP Config - Advanced
View

Session Initiation Protocol
(SIP) Settings
SIP
is an application layer protocol used to establish, modify and terminate
VoIP calls. The following image shows SIP functions available from the
VoIP management website.
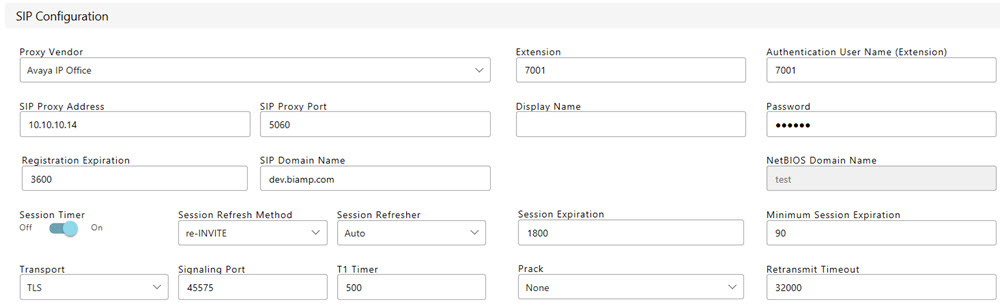
A description
of each field/function follows. Note that different vendors use different
nomenclature with regard to naming conventions: see Vendor
Naming Conventions.
Proxy Vendor
- allows the user to choose the entry that matches the phone system
the VoIP Phone is integrating with.
Extension/SIP
User Name/Line - the alphanumeric string that identifies
the VoIP extension on the network. It is the number or string to dial
to reach this extension.
Authentication User Name (Extension) - the
credentials needed to register and authenticate with the VoIP proxy
server.
SIP Proxy
Address - the network address of the VoIP proxy server.
SIP Proxy
Port - this is the network port the VoIP Phone should use to
communicate with the proxy server. Port 5060 is a standard port used
in VoIP systems, but may be modified as required.
Display
Name - the string used for Caller ID name purposes.
Password - credentials that must be entered.
Registration
Expiration - determines the interval
in which the VoIP line will attempt to re-register with the Proxy.
The proxy may override this setting with a value of its own. If an
acknowledgement has not been received from the Proxy within the agreed
time, the VoIP card registration information kept in the proxy's database
will be cleared. The default registration expiration period is 3600
seconds
SIP Domain
Name - SIP domain name to be used if required.
NetBIOS
Domain Name - Only editable if Proxy Vendor is set to Skype
For Business.
Session
Timer - Enables
periodic refresh of SIP sessions through a Re-INVITE or UPDATE request.
When disabled, the Session Refresher, Session Expiration and Minimum
Session Expiration options will be disregarded. If a call unexpectedly
disconnects, try disabling this option.
- Session Refresh
Method - Update
or re-INVITE mode can be specified. <PLACEHOLDER>
- Session Refresher - in an
SIP session that utilizes a session timer, the Session Refresher is
the device that will send the periodic Session Refresh requests to
refresh the session.
Refresher
Options:
Auto - default setting allows both
ends of the call to negotiate who will be the refresher. This usually
leaves the decision to the device receiving the SIP packets.
UAS - User Agent Server (UAS) is
the VoIP device that responds to the SIP Request. For a phone call, it
is considered the “called” device. This setting makes sure
the SVC-2 card will only negotiate to a Session Timer where the UAS is
nominated as the refresher.
UAC - User Agent Client (UAC) is
the VoIP device that sends the SIP Request. For a phone call, it is considered
the “calling” device. This setting makes sure the SVC-2 card will
only negotiate to a Session Timer where the UAC is nominated as the refresher.
Local - this setting makes sure
the SVC-2 card will always be the refresher of a Session Refresh.
Peer - this setting makes sure the
SVC-2 card will never be the refresher of a Session Refresh.
Session Expiration - determines the
interval the VoIP card will try to negotiate with the Proxy to keep
the VoIP session alive. Note that the proxy may override this setting
with a value of its own. If a Session Refresh request is not properly
received by both parties within this agreed time, the session will
expire and the call ended. This may be set between 90 to 65535 seconds;
the default value is 1800 seconds.
Minimum
Session Expiration - if the proxy tries to override the Session
Expiration value as specified in the VoIP card, the time entered in
this field will be the minimum value allowed. This may be set between
90 to 65535 seconds; the default value is 90.
Transport
- designates the connection protocols for SIP data transfers.
Transfer
Options:
UDP - User Datagram Protocol (UDP)
is "connection-less" and data packets may be sent without negotiation.
There is no handshake or setup; packets can be delivered out of order
or left out completely. UDP prioritizes speed over accuracy.
TCP - Transmission Control Protocol
(TCP) is connection-oriented and a formal connection between endpoints
must be established before any data is transmitted. TCP prioritizes accuracy
over speed.
TLS - Transport Layer Security (TLS)
is used to encrypt SIP traffic and can verify if a device in the SIP exchange
is trusted via certificates. See the following article for more information
on TLS:
Note that when TLS
is selected as the transfer option, a new window will give further options
for browsing/uploading a private key or certificate (see below). Be aware
that certificates uploaded via the VoIP webpage will not be shown in the SIPS data in the Tesira software
interface. Tesira software must configure certificates or the private
key filename, and VoIP will retrieve the files from the provisioning server
if the server is configured.
See the following
article for more information: Using TLS and
SRTP in Tesira VoIP Systems
Signaling
Port - the signaling Port is used to direct incoming SIP traffic
to the correct Line for communications between the VoIP card and the
Proxy. The default port for Line 1 is 5060 and the default port for
Line 2 is 5062. These settings should be left at this value unless
specified by the network administrator
T1 Timer
- this timer is used when sending requests over UDP. If the response
is not received within this interval, the request is retransmitted.
The retransmission interval is doubled after each retransmission.
Prack -
guarantees a reliable and ordered delivery of provisional responses
in SIP. PRACK Improves network reliability by adding an acknowledgement
system to the provisional Responses. Can be set to None, Supported,
Required.
Retransmit
Timeout - the total amount of time the card will continue to
retransmit a UDP packet that has not been responded to.
Real-time
Transport Protocol/Secure Real-time Transport Protocol (RTP/SRTP) Settings
RTP and
SRTP are network protocols for delivering voice content over networks.
SRTP provides encryption and a required message authentication feature.
RTP/SRTP functions available from the VoIP management website are shown
in the image below:

A description
of each field/function is as follows:
Port Start
- the first RTP Port used by this line. Must be between
4000 - 65534 and must be one less than the Port End.
Port End
- the last RTP port used by this line. Must be between
4001 - 65535 and must be one more than the Port Start.
Static
RTP Port - Static Real-time Transport Protocol Port is
the Port number used for RTP traffic.
SRTP
- Secure Real-time Transport Protocol (SRTP) provides encryption of
the RTP audio data. This is available if Transport is set to TCP or
TLS in SIP. SRTP may be set to Disabled, Allowed, Preferred or Required.
See
the following article for more information on SRTP: Using_TLS_and_SRTP_in_Tesira_VoIP_systems
G.723 Encoding
Rate - defines the G.723 bit rate. The options available
are 5.3 and 6.3 kbps.
Suppress
RTCP On Hold - this parameter determines whether RTCP
packets continue to be sent across the trunk for calls that have been
placed on hold.
SIPS

If
TLS is selected as the transfer option, further options are available
to upload certificates:
- SIPS Keyword
- keyword used for secure SIP on a per-Line basis. Certificate
Preference must be set to Keyword.
- Certificate
Preference - can be set to Fully Verify, Trust, Keyword,
or Accept All.
- SIPS
URI - SIP messages will have the following format when
TLS is selected as the Transport and SIPS URI is set to On: sips:abc@biamp.com.
If TLS is used but SIPS URI is set to Off, the format would be: sip:abc@biamp.com.
